 |
|---|
| Buzz Words |
If you want to build a Distributed Hadoop Cluster on AWS EC2 with HBase, then the best option is to use AWS EMR. But if you are like me and want to build your cluster from scratch then, you are in the right place. There can be many reasons to build your clusters, for me, it is to understand as to how the connections happen between master and slaves and dig deeper into systems. Or if you want to just tweak come config or code which is not available in EMR and run the production load.
Hadoop Prerequisites
First thing first, let us launch 4 EC2 instances (1 master and 3 slaves). For simplification, I am not using the bastion host, enabled public IP and have restricted the security group to my IP only. As soon as the instances are ready, label them as master, slave1, slave2 and slave3. I have used ubuntu 18.04 AMI and following is my ~/.ssh/config file.
#OnLocal

Host master
  User ubuntu
  IdentityFile ~/.aws/key.pem
  ProxyCommand ssh -q -W %h:%p ubuntu@ec2-x-x-x-x.us-west-2.compute.amazonaws.com -i ~/.aws/key.pem
  StrictHostKeyChecking no
  UserKnownHostsFile=/dev/null
  HostName 10.0.x.x

Host slave1
  User ubuntu
  IdentityFile ~/.aws/bds.pem
  ProxyCommand ssh -q -W %h:%p ubuntu@x-x-x-x.us-west-2.compute.amazonaws.com -i ~/.aws/key.pem
  StrictHostKeyChecking no
  UserKnownHostsFile=/dev/null
  HostName 10.0.x.x

Host slave2
  User ubuntu
  IdentityFile ~/.aws/bds.pem
  ProxyCommand ssh -q -W %h:%p ubuntu@x-x-x-x.us-west-2.compute.amazonaws.com -i ~/.aws/key.pem
  StrictHostKeyChecking no
  UserKnownHostsFile=/dev/null
  HostName 10.0.x.x

Host slave3
  User ubuntu
  IdentityFile ~/.aws/key.pem
  ProxyCommand ssh -q -W %h:%p ubuntu@x-x-x-x.compute.amazonaws.com -i ~/.aws/bds.pem
  StrictHostKeyChecking no
  UserKnownHostsFile=/dev/null
  HostName 10.0.x.x
Remember to replace the ubuntu@x-x-x-x.us-west-2.compute.amazonaws.com with an actual public DNS of ec2 instances and also change the HostName to private IPv4.
Now with ~/.ssh/config configured, I can simply ssh into the box using ssh master or ssh slave1 etc.
Let us update before we proceed with the installation of Hadoop.
#OnAll

sudo apt update && sudo apt dist-upgrade -y
Next, set the static hostname for the master.
#OnMaster

sudo hostnamectl set-hostname --static master
Similarly for the slaves too.
#OnSlaves

sudo hostnamectl set-hostname --static slave1
sudo hostnamectl set-hostname --static slave2
sudo hostnamectl set-hostname --static slave3
Now open the file sudo vim /etc/cloud/cloud.cfg and configure the below property.
#OnAll

preserve_hostname=true
Now update the /etc/hosts file with the private IP’s of master and slave instances. Here is the list of my IP’s. Remember to remove the first line 127.0.0.1 localhost from the /etc/hosts file.
#OnAll

sudo vim /etc/hosts
10.0.6.80     master
10.0.6.174    slave1
10.0.6.252    slave2
10.0.6.35     slave3
Next, let’s install OpenJDK 8 on the instances
#OnAll

sudo apt install openjdk-8-jdk openjdk-8-jre -y
Now will reboot the instance
#OnAll

sudo reboot
Now let us enable and set a password for the instances. This is being done to make it easier to transfer the files between master and slave nodes. We can always disable it later.
Now, make the below changes on all the nodes
#OnAll

sudo vim /etc/ssh/sshd_config

# Set the below value in the file
PasswordAuthentication yes
Then restart the sshd and set the password for the ubuntu user.
#OnAll

sudo service ssh restart
sudo passwd ubuntu
# Enter the password and remember it for future use
Now Execute next instructions only on the master node. We will generate public/private ssh key and copy it to all the slaves from the master.
#OnMaster

ssh-keygen -b 4096

ssh-copy-id -i $HOME/.ssh/id_rsa.pub ubuntu@master
ssh-copy-id -i $HOME/.ssh/id_rsa.pub ubuntu@slave1
ssh-copy-id -i $HOME/.ssh/id_rsa.pub ubuntu@slave2
ssh-copy-id -i $HOME/.ssh/id_rsa.pub ubuntu@slave3
A Note if the above command ssh-copy-id is freezing, Then you need to take a look at the security group to make sure that you can ssh from master to slave. One way to do it is, to have a common security group (SG) attached to all the instances and add that SG to itself.
Let’s install and setup Hadoop!
On Master Node,
Run the below commands to download, untar and copy Hadoop to /usr/local/hadoop . Let us also give permission to the same directory.
#OnMaster

wget https://archive.apache.org/dist/hadoop/core/hadoop-2.7.3/hadoop-2.7.3.tar.gz
sudo mkdir /usr/local/hadoop
tar -xzf hadoop-2.7.3.tar.gz
sudo mv hadoop-2.7.3/* /usr/local/hadoop/
ls -ltr /usr/local/hadoop/
sudo chown -R ubuntu:ubuntu /usr/local/hadoop
Now let us add some paths to ~/.bashrc file, to make it easier to navigate going forward. Setting PATH’s will always make it easier. Append the below config to your ~/.bashrc file.
#OnMaster

# Java
export JAVA_HOME=/usr/lib/jvm/java-8-openjdk-amd64
export JRE_HOME=/usr/lib/jvm/java-8-openjdk-amd64/jre

# Hadoop
export HADOOP_INSTALL=/usr/local/hadoop
export PATH=$PATH:$HADOOP_INSTALL/bin
export PATH=$PATH:$HADOOP_INSTALL/sbin
export HADOOP_MAPRED_HOME=$HADOOP_INSTALL
export HADOOP_COMMON_HOME=$HADOOP_INSTALL
export HADOOP_HDFS_HOME=$HADOOP_INSTALL
export YARN_HOME=$HADOOP_INSTALL
export HADOOP_COMMON_LIB_NATIVE_DIR=$HADOOP_INSTALL/lib/native
export HADOOP_OPTS="-Djava.library.path=$HADOOP_INSTALL/lib"
Once saved, run the command source ~/.bashrc to update it in the current session.
Now let us make the change to the Hadoop environment to enable it for distributed mode. There is a long list of changes coming ahead.
First, let’s go into cd /usr/local/hadoop/etc/hadoop directory.
- Set the
JAVA_HOMEinhadoop-env.sh.#OnMaster export JAVA_HOME=/usr/lib/jvm/java-8-openjdk-amd64 - Add the YARN config in
yarn-site.xml.#OnMaster <property> <name>yarn.acl.enable</name> <value>0</value> </property> <property> <name>yarn.resourcemanager.hostname</name> <value>master</value> </property> <property> <name>yarn.nodemanager.aux-services</name> <value>mapreduce_shuffle</value> </property> <property> <name>yarn.nodemanager.resource.memory-mb</name> <value>2826</value> </property> <property> <name>yarn.scheduler.maximum-allocation-mb</name> <value>2726</value> </property> <property> <name>yarn.scheduler.minimum-allocation-mb</name> <value>128</value> </property> <property> <name>yarn.nodemanager.vmem-check-enabled</name> <value>false</value> </property> <property> <name>yarn.nodemanager.resource.cpu-vcores</name> <value>2</value> </property>Make sure that the above properties are added between
<configuration>and</configuration>. - Add the below config to
core-site.xml.#OnMaster <property> <name>fs.default.name</name> <value>hdfs://master:9000</value> </property> - Add HDFS config to
hdfs-site.xml.#OnMaster <property> <name>dfs.replication</name> <value>3</value> <description> Default block replication. The actual number of replications can be specified when the file is created. The default is used if replication is not specified in create time. </description> </property> <property> <name>dfs.namenode.name.dir</name> <value>file:/usr/local/hadoop_store/hdfs/namenode</value> </property> <property> <name>dfs.datanode.data.dir</name> <value>file:/usr/local/hadoop_store/hdfs/datanode</value> </property> - Now, let us add Map-Reduce config to
mapred-site.xml. But first, we need to copy the template. This can be done by#OnMaster cp mapred-site.xml.template mapred-site.xmlThen open the file mapred-site.xml and add the below config
  #OnMaster

  <property>
      <name>mapreduce.framework.name</name>
      <value>yarn</value>
  </property>
  <property>
          <name>yarn.app.mapreduce.am.resource.mb</name>
          <value>1024</value>
  </property>
  <property>
          <name>mapreduce.map.memory.mb</name>
          <value>1024</value>
  </property>
  <property>
          <name>mapreduce.reduce.memory.mb</name>
          <value>1024</value>
  </property>
If you are interested in understanding what each property does, then please refer the official documentation for Hadoop.
- Let us create a directory for HDFS store.
#OnMaster sudo mkdir -p /usr/local/hadoop_store/hdfs/namenode sudo mkdir -p /usr/local/hadoop_store/hdfs/datanode sudo chown -R ubuntu:ubuntu /usr/local/hadoop_store/ - Now we have made all the configuration we needed on the master, let us make the changes on the slave node. But first, let us copy the
hadoop-2.7.3.tar.gzto slave nodes.#OnMaster cd ~ scp hadoop-2.7.3.tar.gz ubuntu@slave1:/home/ubuntu/ scp hadoop-2.7.3.tar.gz ubuntu@slave2:/home/ubuntu/ scp hadoop-2.7.3.tar.gz ubuntu@slave3:/home/ubuntu/ -
Once we have copied the files to slave nodes, it is time to make similar changes there as well.
On Slaves,
#OnSlaves sudo mkdir /usr/local/hadoop tar -xzf hadoop-2.7.3.tar.gz sudo mv hadoop-2.7.3/* /usr/local/hadoop/ ls -ltr /usr/local/hadoop/ sudo chown -R ubuntu:ubuntu /usr/local/hadoop -
Now let us add some paths to
~/.bashrcfile in slaves as well.#OnSlaves # Java export JAVA_HOME=/usr/lib/jvm/java-8-openjdk-amd64 export JRE_HOME=/usr/lib/jvm/java-8-openjdk-amd64/jre # Hadoop export HADOOP_INSTALL=/usr/local/hadoop export PATH=$PATH:$HADOOP_INSTALL/bin export PATH=$PATH:$HADOOP_INSTALL/sbin export HADOOP_MAPRED_HOME=$HADOOP_INSTALL export HADOOP_COMMON_HOME=$HADOOP_INSTALL export HADOOP_HDFS_HOME=$HADOOP_INSTALL export YARN_HOME=$HADOOP_INSTALL export HADOOP_COMMON_LIB_NATIVE_DIR=$HADOOP_INSTALL/lib/native export HADOOP_OPTS="-Djava.library.path=$HADOOP_INSTALL/lib"Once saved, run the command source
~/.bashrcto update it in the current session. -
Let us create a directory for HDFS store in the slave as well.
  #OnSlaves

  sudo mkdir -p /usr/local/hadoop_store/hdfs/namenode
  sudo mkdir -p /usr/local/hadoop_store/hdfs/datanode
  sudo chown -R ubuntu:ubuntu /usr/local/hadoop_store/
Now that we have configured slaves, let us move back to the master node.
On Master,
-
Let us copy all the changes we did to Hadoop Configuration to Slaves as well.
#OnMaster scp /usr/local/hadoop/etc/hadoop/* ubuntu@slave1:/usr/local/hadoop/etc/hadoop/ scp /usr/local/hadoop/etc/hadoop/* ubuntu@slave2:/usr/local/hadoop/etc/hadoop/ scp /usr/local/hadoop/etc/hadoop/* ubuntu@slave3:/usr/local/hadoop/etc/hadoop/ - Let us add the slave names to the
/usr/local/hadoop/etc/hadoop/slavesfile.#OnMaster slave1 slave2 slave3Now we are done with Hadoop Setup.
Let us start the Hadoop and Test!
On Master again,
-
Let us format
namenode,#OnMaster hdfs namenode -format - Then we will start the
DFS#OnMaster start-dfs.sh - To check if everything is configured properly, let us check
jps#OnMaster jps - On the Master node, the output should be
#OnMaster 4448 SecondaryNameNode 4572 Jps 4175 NameNode - And on the slave nodes
  #OnSlaves

  2632 DataNode
  2713 Jps
Of course, the PID’s will be different.
- Now let us start YARN as well
#OnMaster start-yarn.sh -
Now when we run
jps, we should see ResourceManager getting added to the list in master and NodeManager in slaves.#OnMaster 4448 SecondaryNameNode 4631 ResourceManager 4895 Jps 4175 NameNode #OnSlaves 2832 NodeManager 2632 DataNode 2943 JpsAnd also you see if everything is running fine is the UI as well. First, find out the public IP for the master node. DFS UI is on the port 50070 and YARN UI is on 8088.
DFS: http://:50070
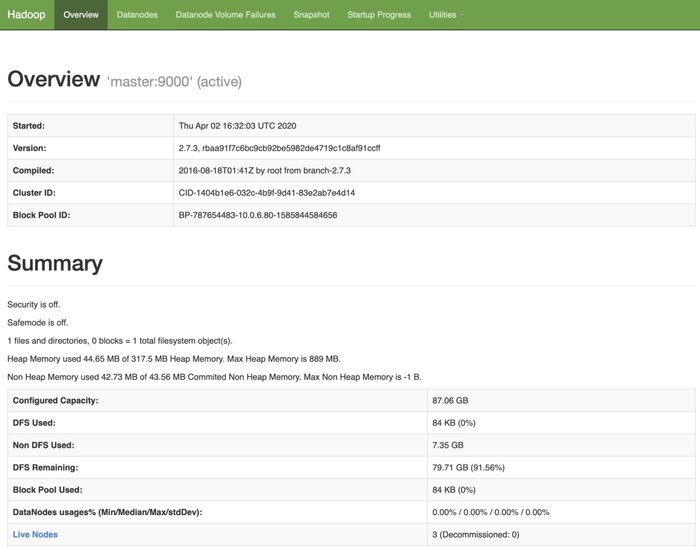 |
|---|
| DFS Dashboard |
YARN: http://:8088/cluster
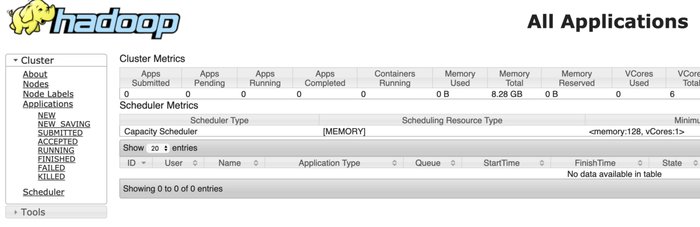 |
|---|
| YARN Dashboard |
Now we can run a small Map Reduce Job of counting the words in a text. Execute the below commands in the Master (of course) to run the job.
#OnMaster

cd ~
mkdir sample_data
cd sample_data/
wget -O alice.txt https://www.gutenberg.org/files/11/11-0.txt
cd ~
hadoop fs -copyFromLocal sample_data/alice.txt hdfs://master:9000/
hdfs dfs -ls hdfs://master:9000/
yarn jar /usr/local/hadoop/share/hadoop/mapreduce/hadoop-mapreduce-examples-2.7.3.jar wordcount "hdfs://master:9000/alice.txt" hdfs://master:9000/output/
While the job is running you can also visit the YARN UI to track the Job.
HBase
- Let us download the HBase and then untar and copy the files to
/usr/local/hbasedirectory. The official link to download the HBase can be found here. From there you have to find the mirror and download it. Please feel free the replace the link based on your location. Also, I have tested with HBase version1.4.13.#OnMaster wget https://downloads.apache.org/hbase/1.4.13/hbase-1.4.13-bin.tar.gz tar -zxvf hbase-1.4.13-bin.tar.gz sudo mv hbase-1.4.13 /usr/local/hbase sudo chown -R ubuntu:ubuntu /usr/local/hbase - Add the below commands to
~/.bashrcfile#OnMaster export HBASE_HOME=/usr/local/hbase export PATH=$PATH:$HBASE_HOME/binThen, as usual source the file. source ~/.bashrc.
- Update the HBase Config files
#OnMaster cd /usr/local/hbase/conf/ - Set the
JAVA_HOMEinhbase-env.shfile.#OnMaster export JAVA_HOME=/usr/lib/jvm/java-8-openjdk-amd64 - Then, proceed to add the properties to
hbase-site.xmlfile.#OnMaster <property> <name>hbase.rootdir</name> <value>hdfs://master:9000/hbase</value> </property> <property> <name>hbase.zookeeper.property.dataDir</name> <value>hdfs://master:9000/zookeeper</value> </property> <property> <name>hbase.cluster.distributed</name> <value>true</value> </property> <property> <name>hbase.zookeeper.quorum</name> <value>slave1,slave2,slave3</value> </property> - Then add the slave names to
regionservers#OnMaster slave1 slave2 slave3 - Now On the Slave Nodes, make the create /usr/local/hbase directory and give permissions so that we can copy the files from the master to slave nodes. Make the following changes on the slaves.
#OnSlaves sudo mkdir -p /usr/local/hbase sudo chown -R ubuntu:ubuntu /usr/local/hbase - Now, from the master again, we need to copy the HBase file to slaves. Run the below commands to do that.
#OnMaster scp -rp /usr/local/hbase/* ubuntu@slave1:/usr/local/hbase/ scp -rp /usr/local/hbase/* ubuntu@slave2:/usr/local/hbase/ scp -rp /usr/local/hbase/* ubuntu@slave3:/usr/local/hbase/ - Now it is time to start the HBase. Make sure that the Hadoop is running, before you start the HBase.
#OnMaster start-hbase.sh - When you run jps command,
  #OnMaster

  7616 NameNode
  7891 SecondaryNameNode
  8851 Jps
  8581 HMaster
  8056 ResourceManager

  #OnSlave

  4741 DataNode
  5270 HQuorumPeer
  5614 Jps
  5438 HRegionServer
  4927 NodeManager
The HBase also has a UI to see the RegionServers information among other things.
HBase UI: http://:16010/master-status
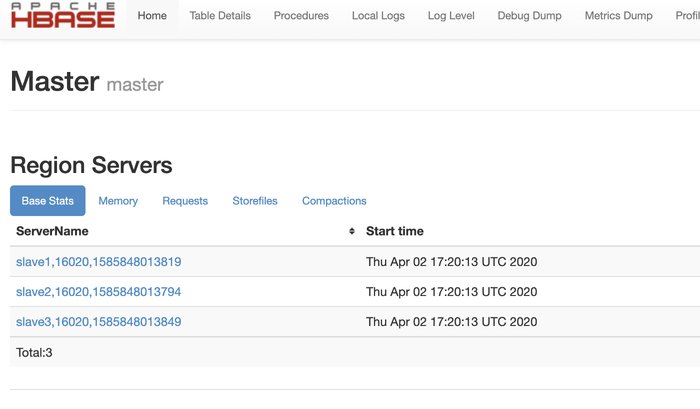 |
|---|
| HBase Dashboard |
Hadoop and HBase are up and running in the distributed mode with a replication factor of 3 on the AWS EC2 instances!
References
- https://medium.com/@zaman.nuces/setting-up-fully-distributed-hadoop-cluster-series-2-of-3-27b9831c25ae
- https://aws.amazon.com/premiumsupport/knowledge-center/linux-static-hostname-rhel7-centos7/
- https://www.digitalocean.com/community/questions/ssh-copy-id-not-working-permission-denied-publickey
- https://aws.amazon.com/premiumsupport/knowledge-center/ec2-password-login/
- https://medium.com/@yzhong.cs/hbase-installation-step-by-step-guide-cb73381a7a4c
- https://unsplash.com/photos/gpjvRZyavZc
- https://hadoop.apache.org/docs/stable/hadoop-project-dist/hadoop-common/ClusterSetup.html
- https://hbase.apache.org/book.html#configuration